
Three lessons in pixel art animation
I got really motivated this last week to get a Steam page together for Boardwalk Builders (yeah I think I’m updating the name to Boardwalk Builders now…). Over the next few weeks, my goal is to create enough content to put together some great looking screenshots of the game and enough video footage for a 15-30 second trailer, then get the steam page up and officially announce the game.
To get all put together, I needed to create some shoppers. It was a ton of fun. I love making pixel art stuff. Here’s how they turned out.

Shoppers on their way to spend their hard earned cash at the boardwalk.
Quite frankly I think they are awesome. Most of my sprites in the past have been very large. Some of the Karens in AotK were well over 300x300 pixels, and that made for very difficult animation. Because of that, I knew I wanted to make the animated sprites in this game much smaller. I chose 16x16 for the character sprites in Boardwalk Builders, partly because they will be taking up a small part of the action, but also to make animation easier. Being small, however, didn’t mean they shouldn’t be interesting or well animated.
In this post I’m going to take you through the artwork process I used to create these little guys (and gals) and in doing share three things I’ve learned over the years about pixel art animation. There are so many amazing pixel artists out there who are more talented and skilled than myself, but people who reviewed and played Attack of the Karens enjoyed the artwork so I feel like I’m finally in a spot where I can share some of my knowledge. I’m not creating this post to brag, but to pass along what I’ve learned through hard lessons and mistakes so you don’t have to.
1 - Start Small
You can obviously choose whatever size you want. There are YouTube videos out there that say you need to make sprites in multiples of 16 pixels, but you don’t. It does make it easier when you’re working with a grid-based environment, however, and since Boardwalk Builders is built on a 32x32 grid system, making the character sprites to fit within that made sense.
When making pixel art bear in mind that the more pixels you have on your canvas, the time it takes to create art and animate it increases exponentially. Not linearly, exponentially. This means that what takes 30 minutes to animate for a 16x16 sprite could take 3 or 4 times as long for a 32x32 sprite. The reason is because many more decisions have to be made. By limiting the canvas, you really only have 2 or 3 choices on pixel placement, but opening it up makes deciding where to put arms, eyes, feet, windows, signs, etc. a lot more time consuming. So it makes sense that you should always start as small as you can - like everything else in game dev.
Starting small also forces you to leave out details in the art. This is hands down the biggest lesson I’ve learned in pixel art - details don’t matter. Look at the characters above, their eyes are a single pixel, their hands are a single pixel and it still looks good because it’s expected and works within the medium. Many new artists try to draw each strand or section of hair individually and it just leads to so many colors trying to do too many things. Think in general terms of shapes and more often than not, that is enough for pixel art - In fact, it adds to the charm.
2 - Colors Matter (a lot)
Color is everything. Color evokes emotional responses and connects us to art. It’s no different with pixels. Color theory in itself is a board topic, so for now I’m just going to say that you need to be careful when picking a palette. Too often I see bland and lifeless palettes in beginner pixel art. Even if the technique is solid, the art comes off as lifeless and dull. Don’t be afraid to use colors that aren’t exactly in real life, it makes things interesting. Take the buildings in Boardwalk Builders for example.

Buildings in Boardwalk Builder.
I’ve never seen that many buildings with a yellow or green roof before. I chose those colors because they are complimentary to the siding of the same buildings - blue and yellow, green and purple. Complimentary colors do a whole lot to interest to the human eye. They look so good together and make things feel polished and high quality.
You can go create your own palette and try all kinds of different colors, but if you’re new to pixel art start with a pre-made palette. There are tons on lospec.com. Doing this will make the color decisions for you and let you focus on technique without sacrificing color quality. Making your own palette can be very daunting and frustrating at first. Until you understand how colors work together, I wouldn’t recommend it.
If you do want to take a stab at making palettes, I would highly recommend this video. That’s how I learned to do it, and it’s how I got the palette I’m using for Boardwalk Builders. Remember: hue shifting makes things beautiful.
No matter what you do, don’t take color decisions lightly. You’ll be grateful in the end for giving it the time it deserves.
3 - Make Animations Come to Life!
This is the reason I really wanted to make this blog post. Animation can be a daunting task for any pixel artist, whether beginner or veteran. Painstaking frame-by-frame animation is the bane of any pixel artist. I’ve always had to go by one rule when working with animations: good animations take time. They just do, there’s no way around it.
One thing that makes animation easier, however, goes back to point number one. The less pixels in the space, the less that has to move and the less time it takes to decide where they need to go. It’s important to remember, however, that animation is what makes pixel art come to life!
One key decision I had to make when looking at the shopper characters for Boardwalk Builders was how many frames to make animations. This is important because the fewer frames you have available the less you can make happen. It’s a little hard to explain over words so I’ll use visuals.
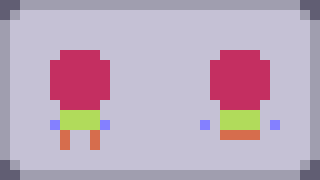
Four frame (left) and eight frame (right) walk cycles.
This is the base character animation I used to create the different sprites. Left is a four frame walk cycle and right is an 8 frame walk cycle. They both have the same keyframes: neutral, front leg back, neutral, rear leg back, but the eight frame animation allows more movement between the keyframes while the four frame cycle only allows for keyframe positions. This results in the four frame animation feeling rigid and very retro pixel art. It’s fine if that’s what you’re going for, but I wasn’t satisfied with this when I finished the four frame animations for the characters.
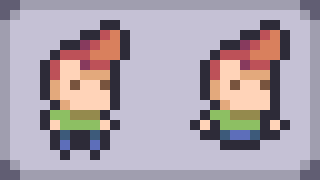
Four frame (left) and eight frame (right) character walk cycles.
Can you notice the specific differences between the two? The most obvious one is the hair. With a four frame animation, there is no room to allow the hair and head to bounce. Having the head and hair move is a key part of an expressive pixel art animation, perhaps the biggest. Also, the arms get to swing out as the character jogs, while the four frame animation’s arms just kind of stick out then come back in.
While they are connected to the body, limbs and hair bounce and move when a person runs. Head leads the movement while limbs follow, and the hair should lag behind the head. With eight frames, there is so much more expressive opportunity, but it does increase the time to create each frame. The same can also be done in an idle animation, allowing for a bit more bounce as the character idles up and down.
After having created the eight frame walk animation, I knew that I had to use it. It’ll be longer to make the characters but in the end it’ll make the customers much more fun to watch while you mange your boardwalk and it will feel like the place is much more lively.
Hopefully this blog post taught you something about pixel art animation and I hope you enjoyed a peek behind the scenes of my game!
Don’t forget to subscribe to my email list if you haven’t already for frequent updates on our games as well as exclusive beta access to Boardwalk Builder when the beta is ready for testing (it’ll be a while, but why not sign up now?).
Until next week,
Joel